Showing posts with label longarm quilting. Show all posts

June 14, 2016

Happy Flag Day with Lady Liberty!

I've been plugging away on Lady Liberty for years! 
Between client quilts, i had a chance to slip it onto my longarm.                                                        Yippee!!  


If you are on Instagram...you'll find me there too!  I posted this picture recently sharing my quilting design idea.  

\\
Someone asked on Instagram if i would share how i did the quilting.  I like feathers... lol 

First, I drew my design onto a photo copy of the pattern.

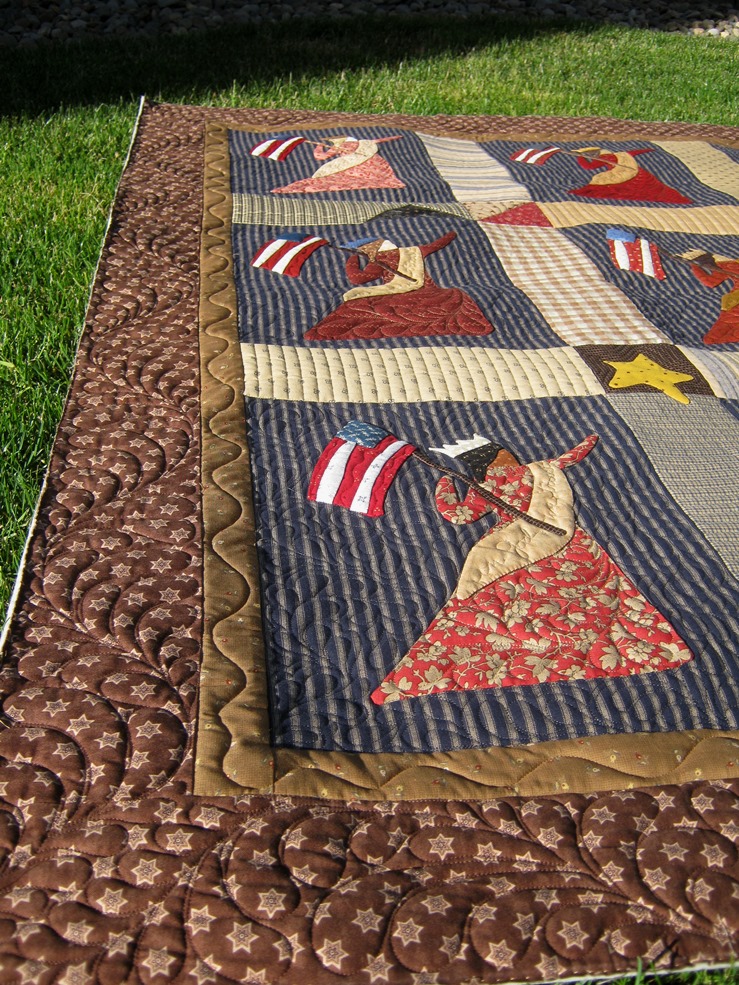
I marked my lady's skirt with a dividing line (as you can see by the white ceramic pencil mark) plus an additional curled line.  These lines remind me where to stop and when to curl the feathers.  Then quilted free hand feathers.

They are never perfect or the same...but we're all different right?

A few feathers in her hair, a simple necklace and star.

In God we trust was quilted into each sash.

The background fill behind each lady is what i call feather fronds.  Little snippets of connected feathers.  Wavy lines in the flags, straight lines in the sashing areas using Linda Hrcka's QP Edge straight ruler.  A bit of echoing and micro-stippling to make a few freehand stars pop!


The inner border is a simple wavy line.  The final border...more feathers!  I used Linda's #12 QP Curved template to mark the spine then added the feathers freehand.  Super fun!
Before i began all the fun quilting, every block, seam and applique edges were stitched in the ditch.  


Mondays are my Play~Days with friends.  Yesterday we made flags!
Wool background, red cotton stripes with a blue cotton field.  Pearl Cotton for french knots and running stitches.   
A stick plus tacky glue...and we have a flag made in time for Flag Day!

Make every day a Fun Day!

Links to where you can purchase Lady Liberty and Sewline Pencils

February 19, 2016

Practice, Practice, Practice...

I've not done feathered rings or wreaths much and thought i should do a bit of practicing before i stitch these into my client's quilt.

 I won't be using a contrasting thread on the 'real quilt'...but i do find this practice piece fun and telling!  The contrasting thread jumps out and tells me where improvements are needed.  

The two feathered circles in front, in my opinion, need a bit of rework....the forward circle is not bad...but i think the feathers are a bit too long and skinny.  The next circle, too fat and not spaced well.
 However...sometimes the beauty of free motion, free hand quilting, IS in the imperfections, void of the computerized perfection. 

The larger circle in the back lacks an inner feathered circle...instead i did a simple spiral.  

If you find yourself not happy with your free motion ability, keep practicing!  Never give up!  Or simply change it up!

Learn, Share, Quilt!

January 16, 2016

Country Plates

Over my Christmas break i was able to work on one of my own quilts!  Just like the cobbler's children have no shoes, i rarely get my own tops quilted.
So with that said....here's a bunch of pictures!!


The starting of Country Plates...


 Fabric line is mostly Walk in the Park but any cute 30's line would be great!


Did I say a 'bunch' of pictures?  Lol

In Country Plates, there are a total of 20 Farmer's Wife blocks using the Farmer's Wife Quilt Revival Classes
Class 1 and 2 gives modern rotary cutting and piecing instructions for making 20 blocks AND class 2 includes a 10 block table runner pattern, set similar to my Country Plates quilt. 

My 'Set Your Quilt'  pattern includes how to create a 'Zigzag On point' setting along with 5 other settings and math charts so you can determine a quilt style and size that works for you. 


Sashed with freehand spines and feathers...with swags in the final border.

I stitched in the ditch around each block and cross hatched 2" inside the blocks.  Used Linda Hrcka's QP Curved templates for circles to create a 'plate', then feathered inside each.

Kind of reminds me of white paper plates...
so i named this quilt 'Country Plates'!   

More stitch in the ditch around the inner border
  YAY!  A 2016 FINISH!!

April 26, 2014

Behind the scenes of a longarmer

Do you send your quilts to a longarmer?  Are you a longarmer?  I'm writing a series of blog posts for Craftsy on longarm quilting.  Two have been published with three more on the way within the next month or so.

This is what you can expect in my longarm series:

1.  Preparing a quilt for longarm quilting.
     This is an important step to ensure your quilt loads well onto a longarm machine, keeping your longarmer happy.  

2.  How to load a quilt onto a longarm machine.
     A behind the scene look at loading a quilt.  Having read Step 1, you'll see the importance of preparing a quilt properly. 


3.  How should I quilt my quilt?
     How do you and your longarmer decide on design and threads choices? This post will give you some great quilting options to consider.

4. Stitching the binding using a longarm machine.
    Did you know your longarmer can do this for you?  Discover how this is done on a longarm machine

5.  Is longarming for you?
     This topic gives you ideas to consider if you are thinking of purchasing a longarm for personal use or starting your own business.

Click HERE to find all my blog posts on Craftsy as well as the first two installments in my longarm series.

When you visit my posts...let me know if you find the information helpful.  I appreciate the feedback and so does Craftsy.  :)  

LinkWithin

Related Posts Plugin for WordPress, Blogger...