
Introducing a new pattern called
Strawberry Patches!
The photo below is my mock up//practice quilt. Grabbing what i have from my stash, testing strawberry shapes, adding a leaf, eliminating a seam or 2...deciding which way to press what...
All the things that go on behind the scenes...
Then the hardest part! Writing instructions. Hours go into that piece. Sitting at my computer, blurry eyed after reworking, finding mistakes...so many numbers, words...does it make sense? Did i forget an important part or measurement? Did i write the measurement correctly?

I called a couple quilting friends to tear apart every detail! Jean is a retired math teacher and Susan retired from years of secretarial work. A great combination for scrutinizing the pattern!!
In the final quilt there will be a chunky berry and a pointy berry.
This is Jean's chunky strawberry in batiks!

The instructions are now complete with one minor omission. The actual quilt!
The final quilt will look like the diagram below. The brown I have chosen will make its debut in June. It's from Renee Nanneman's new line called Pumpkin Patch Plaids. You'll want to stock up!
I am making all my strawberries scrappy...30 different reds with a few brown toned pinks thrown in.
Until the brown arrives, i'm not sure what greens i will use.

And below is the background i have picked out...provided it goes well with the brown. I can't imagine why it would not...cuz it's so darn cute!!
It's from Edyta Sitar's Little Sweetheart line called Bubbles.
And now for the Pictorial piece...
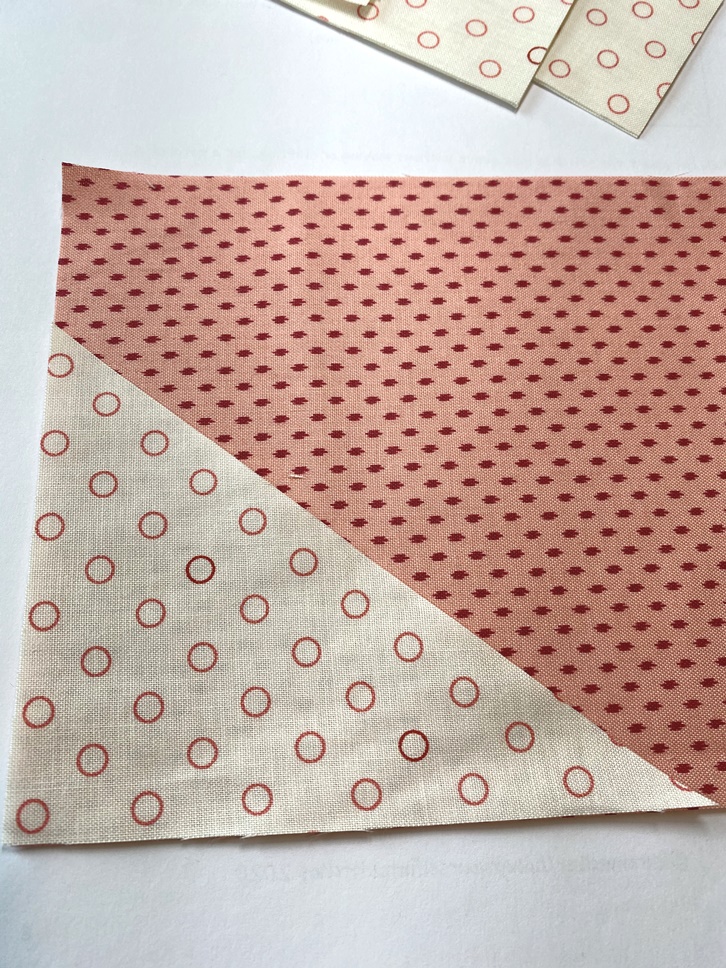
There are a couple places in the Strawberry Patch quilt that require an irregular triangle. I did not want to get into cutting templates (yuk) so i figured i could accomplish my goal through rectangles.
I can cut those! Lol

The strawberries have a triangle in each lower corner. One cut from this direction

And the other from this direction.
(if you stack two rectangles as shown in the first photo...and cut diagonally, you'll get 2 of each)

In the instructions, you will be asked to lay a triangle in the bottom corners of the strawberry fabric. The right angles will match with the tall end of the triangle along the side with the shorter end along the bottom. Like shown below.

This triangle placed incorrectly.
Place a little mark where the arrows are located (following the measurements in the instructions) and draw a diagonal line.


With right sides together, line it up with the drawn line. Do a little flip test to make sure when sewn, it covers the entire corner.

Pin in place and sew 1/4 seam


Once sewn, flip it over and press...but do not trim yet.
Add the other triangle to the opposite corner and do the same.


Once both are sewn and pressed, it will look like this.

Flip the unit over to the backside and trim, making sure the strawberry fabric remains its original size.

There will be excess fabric underneath

Trim to 1/4 seam under both triangles.


In addition to the strawberry triangles, there are also irregular triangles that create a diamond shape in the quilt. The same principle applies when adding them.

So I have listed Strawberry Patches in my Etsy shop in digital form for only $8. View the listing for more color options!
It will not have an official cover, because i have no final quilt to photograph yet. And hard copies will not be available until i do.
So take advantage of this opportunity to save a little $ and make your very own Strawberry Patch.


Looks good! Now to make some more strawberries. Or maybe find some to make some jam!
ReplyDelete